|
Total Commander ver 7.50a - Author : Christian Ghisler |
| TOTAL COMMANDER Tips And TrickS |
|
Version 7.50a This version has lots of changes. Now there is Unicode support. And some functions have been changed or added. |
|
Plugins from 6.50 on In version 6.50 a new group of plugins is added : "Content". Installing most of the plugins has become very simple now. When the zip-file is activated, an installation-pane shows up, which, as a default, already direct to the correct subdirs of TC. TC has in the directory 'plugins' four subdirs for the different catagories : ▶ wcx - Packers ▶ wdx - Content ▶ wfx - File System ▶ wlx - Lister (F3) Content plugins are alternative displays of a complete pane, with relevant info in the columns. Route to that choice : Show / Custom columns mode. An example is the ImgSize plugin for bitmaps : |

|
|
For this there are also versions of e.g. audio-files, with data about duration, resolution and tags.. Almost all plugins (plus other add-ons) can be found at www.totalcmd.net. |
|
What's i.a. new in version 6.01 ? On the interface two buttons are added on the 'path-bar' : |

|
|
The button with the asterisk is the 'Directory hotlist (Ctrl+D) for a quick choice in a custom-made list to an often-used directory. ( 1 list for both L and R ) The button with arrow-down is the 'History' (Alt-down) with all previsited dirs of that session for a quick jump. Configuration/Options has changed into a vertical list in stead of tabs. In Configuration/Options/Display/ with 'show parent dir etc' also a upper line can be added, being in the root of a station, which leads you to 'This Computer'. In Configuration/Options/Folder Tabs/ you can, with the top option 'Show tab header etc' enabled, add 'Folder Tabs' on top of each pane. More tabs can be 'locked' ( R-klik on the Tab ) and/or saved in a list. |
|
Wat does Total Commander do? : TC is more than just file-handling. TC can replace a desktop. TC is a toolbox, custom-filled with access to almost any element in the system. TC is a work-field with a representation according to the two-panes concept, like it's used in a FTP-program. Besides the clarity of the source-destination view, it has more advantages, like comparison for example. TC gives also constant status-information, which otherwise has to be searched for with extra actions. Like on top of the panes the free space on a partition and at the bottom the total number of Kbytes of a directory or a file-selection. TC memorizes the locations of the directories used before closing TC, so there is a quick representation of that work-situation in the next session. TC has a 'custum' toolbar with icons, which can point, with one click, to any application, available, files to open, or directory view. TC still fits on one diskette of 1.4 Mb.. |
|
TC setup : Install goes default to c:\totalcmd\ , or to c:\wincmd\ in case of a previous version there. During setup there is the choice where the ini-files must come. The large Winblows-dir or TC's own dir (always better). Nothing active in the registry. |
|
TC activation : TC starts default with LR-panes as they were at the last close-down. With the shareware-version you need to make an extra click on a 1, 2 or 3 (or Alt-nr). after that, TC is fully functional. |
|
TC configuration : Make sure in Configuration/Options/Display - File display the hidden/systemfiles are enabled. To show any file that's present. Lots of language modules (subdir ../language). Some files with specific extensions can have custom-colours. |
|
Added values : Functions for a Network, FTP, or a Port-connection via COM or LPT. Functions for Packing (zipping) and Unpacking (also with subdirs..) Functions for Splitting and Re-Combining files with CRC-check (handy if a file just doesn't fit on 1 diskette for a transport) Functions (very detailed) for Multi-Renaming groups of files (handy with a range of digital photo-files, all starting with 'dscn' or such) Function to compare exactly the contents of two files. Functions to save and choose favourite directories. CRC checksums (SFV). Coding of MIME, UUE, XXE, and more. Surveyable. Custom-programmable Toolbar. |
|
Selection of drive : Even with a 1-partition system there are always more drives, e.g. diskette-drive, Cd-drive or camera. Kb shortcuts : For Left : Alt-F1 plus drive-letter. For Right : Alt-F2 plus ,, Picking a drive does not automatically mean : to the root-directory. If Right has the path : F:\arch\buffer, then, by choosing the same drive on the left pane, Left will also be at : F:\arch\buffer. An extra option for navigation. Can be useful to make a short jump to a neighbouring directory up or down the tree for a next file-action . Or to unpack a zipfile in it's own directory. And vice versa. Create a subdir to move files to that level. |
|
Selecting Left- or Right-pane :
A two-pane system gives the situation "Source - Destination". The active pane is the 'source', as with a copy-action or unpacking zipped files. ( default colors in top bar of the panes : active = blue, passive = grey ) Change the active side with the 'Tab' key. Or click somewhere in the passive area. Exchanging the paths of the 2 panes : Ctrl-U. |
|
Quickset to desired directory : Sometimes choosing a higher parent directory is quicker to reach the preferred path. Sometimes it's quicker to go to the Root first, and then go down the subdirs. The '\'-button right at the top of the pane puts it in root-position. The '..'-button aside goes one directory up. |
|
Files selection : Control- or Shift-keys are no longer needed. Although they still work like that. For 1 file selection is not needed. It's enough to have the cursor on it to do an action. Selection of files can be done with the 'insert'-key (sequential jump), or, depending on the choice in 'Configuration/Options/Operation/Mouse selecting mode', with L-click (Windoze) or R-click (NC-mode) with a drag-over for a file-group. NB : Explorer-adepts in NC-mode : if you keep the R-button somewhat longer down, you will still get the usual popup with the objects. All files in a dir : Grey '+' key (numpad) (ignore popup) and Enter. That '+' selects in fact on the wildcards *.* . In the popup this can be edited ( *.bmp etc.). De-selecting : another 'insert' or (R-)click on the file. de-selecting all in the dir : grey '-' key (numpad) and Enter. Any selection shows at the bottom of the pane how many files and total Kbytes. |
|
How many bytes are there in the dir ? : Cursor on it and hit the Space-key. If you like to know the size of all the subdirs : Shift+Alt+Enter. (if Show Full) |
|
F3 - View : The Lister. Views any file. At least in code. Different reproductions possible. More Lister-windows can be opened at the same time. Exe-, dll-files etc. give bytes of the file in Ascii or e.g. hexadecimal. Textfiles of course in plain Ascii-format. Html-files with or without tags. It's also a simple media-player of mid-, wav-, mp3-, avi- or mpeg-files. If more files are selected then F3 will play them all in the order defined by the sorting method of the directory. So as a default alfabetically. 'N' is for a skip to the next file, 'P' for playing the previous one. If the representation of such (media)-file should be in byte-form : Rename the extension temporary into a non-valid one (like .m33) and do a F3 again. This can be useful in case of an unknown format, a suspect file or a file with the wrong extension e.g. '.mp3' while it is a .wav-file. In the header of files often are terms which can make quite clear what kind of format we are dealing with. Often already in the first line(s) : "JFIF" = JPG - "BM" = BMP - "PNG" = PNG - "GIF89a" = GIF "RIFF" = WAV - "��" = MP3 - "PK" = ZIP "MZ" plus 'This program must be run under Win32' or 'This program cannot be run in DOS mode' = EXE. There are TC plugins to expand the function of F3, called 'Lister plugins' (.wlx) to be able to view more formats. |
|
F4 - Edit : Default this editor will open Notepad. Better alternatives, like EditPad Lite, can be implemented via : Configuration - Options - Edit/View - Editor for F4. Smart expansion of this function with the TC add-on "Choice Editor". The program, that should be opened, to edit a certain file-format, can be saved as a preset. After that F4 starts the editor at once, so an extra option besides doing an Enter or d-click on a file, which most of the time will be associated to a player cq viewer to start. |
|
F5 - Copy : This 'copy'-action is in fact a 'copy/paste'-action in one click. Useful advantage when copying files from a Cdrom : The 'read-only' attribute is replaced automatically by the 'archive' attribute. No more messages before you can change or wipe that file. |
|
F6 - combination Move/Rename : Never mind the popup most of the time. Move (same routine as with F5-copy) : Put L/R on the right source/destination, put cursor on file or dir, hit F6 and Enter. Rename : Cursor on file or dir, hit F6, type in new name (file : extension included) and Enter. |
|
Shift+F6 - Select the string of filename and extension With this the complete filename under the cursor is selected as ASCII-string. So editing is possible. Of course by starting to type something else after Shift+F6. But more's possible. Changing just 1 or more characters in a name for example. After Shift+F6 use the L/R arrowkeys for the right position, replace the character(s), close with 'Enter". You only want to select the name, without the extension characters ? Shift+F6 and again F6. The first key-touch after Shift+F6 defines the functioning of edit. And the Enter key stops that. Is it an arrow-key, the cursor within the selection will change position. Is it an alfabet-key, then the selection disappears and you can add a new string from that position. Redo: If during the editing you're really messing things up, avoid Enter and recap with Esc. NB : It is a selection, so Shift+F6 can be copied to the clipboard (Ctrl+C) to be pasted in e.g. a text-file (Ctrl+V). More : The same name-selection is made with the TC-command "cm_CopyNamesToClip". You'll have to make a button for that in your custombar though. Then it is Shift+F6 and Ctrl+C in 1 click. Extra advantage : more files can be selected for a copy. So you can quickly place the names of all files of a certain directory in a text-file. |
|
Split files and recombine : Splitting files in smaller pieces can be useful if you want to take a file of, say, 4 Mb to another computer. So too big for one diskette. Prepare source/destination dirs and go to 'Files/Split File'. The max filesize is already set default on 1.4 Mb. After the command the splitted files have the extensions 001, 002, 003 etc. plus a small file with extension 'crc'. This CRC is an extra check. To re-combine on the other computer into the original file : Make sure of course that all files are in the same directory. Select the file with the extension '001' and go to 'Files/Combine Files'. NB : this implicates, that TC also is present on the other computer. If not, solutions : 1 - Take TC with you (1 diskette extra) and install it temporary. 2 - Combine the files with the Dos-command 'copy'. This method has no CRC-check. Suppose, a split of the file 'data.zip' of 4 Mb results in the files 'data.001'. 'data002', 'data003' (and 'data.crc') . The command to combine those files again then is : 'copy /b data.001 + data.002 + data.003 data.zip'. (dos-batch-files possible) (the slash b option is necessary, to prevent extra addition of linefeed-characters) 3 - Use the program 'Combinecrc' I got from the author of TC. With CRC and only 57 Kb, so easy to take with you on some spare room on a diskette. To be found here : Combinecrc, source code included Tip : Considering the ongoing decline of diskette-qualitiy it's better to set maxfilesize a bit smaller than 1.457 Mb (bad sectors ..) if possible. In the meantime this could of course also be relevant to other media, like a zip-disk. Even an USB-stick could be too small to transfer a very big movie. |
|
How to make your own Button-bar ? After setup the button-bar looks like this (W2k) : |
|
|
|
Many buttons there, are possibly rarely used. Maybe only the zip-function and the FTP. Of course it's personal. One can also keep the TC-bar as is, and create one's own subbars with applications or files. But this offers a very efficient alternative for the classic desktop which uses the whole screen. Here also icons can be placed pointing to programs, files and all internal commands of TC. Activated by 1 click instead of a double-click .. For editing : Go to Configurations/Button Bar. Buttons can be deleted or added (to the right side of the selected position). Create space with an empty addition. |

|
|
Also, as in this case, if there's the choice for an internal TC-command at the bottom there is the application (Icon File) and the choice of the icons. You can choose for any other icon at Icon File Text at 'Tooltip' has to be filled in, and is shown at a mouse-over on the button. An example of a button to set the L/R panes in a root-starting position of C and E : |

|
|
The upper path of Command: comes in the active pane, the start-path in the other. It's shown here, that the available icons (importing external *.ico-files is also possible) are to be found in the TC-executable but also in the file : wcmicons.dll. (In the meantime this specific example of choosing directories is solved by the new feature of TC : 'Directory hotlist') Creating groups of buttons with separators (empty space) to have better survey of the type of applications : Select icon-position in bar, do 'add' and 'OK' to create an extra space at the right. This can be finetuned, with more added empty spaces, because the actual single space on the bar is much less than the width of a default icon. The setting of a button-bar is saved in 2 files : name.bar and name.br1 Default name = 'default'. Other bars can be loaded to switch to, with the browse button Adding of an application : Set position in bar on the icon of a link, you want to place the new one next to at the right, and click 'Add'. Then go with the browse-button |

|
|
An efficient preparation for this is to put the active dir in TC already to the program to be added. Then the browse-button will read this as first. The rest is added automatically under there. Choose the icon (if there are more) and edit the Tooltip-text for the mouse-over. Since the last versions the Change button bar dialog has been changed a bit. On the line of Command the buttons are changed from : The arrow-down to get the list of internal commands has been replaced by the looking-glass. The other two buttons are merged into the Change button. Which shows this menu : |
|
|
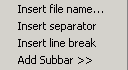
"Insert file name" has replaced the >> button. So the choice for a program (an .exe file), to start. Or a file with data, to be opened with the program, associated to it. Until now I don't understand the result of "Insert separator" "Insert line break" on a certain position in the bar, means adding a new bar. Below the existing one, with the possible icons at the right of the line break point. Such a 2nd bar of course takes space from the actual screen, but may be an alternative for a subbar. "Add Subbar" asks in an Open dialog for a *.bar file. So this stays the same problem. A subbar as .bar file has to be present already. In this case, jump to Making a sub custom bar |
|
|
|
The Multi - Rename Tool (Ctrl+M) Can be very convenient with groups of files. But also with single ones. First select the relevant files. Then Ctrl+M. All capitals in the filename and/or extension lowercase ? A counter adding at the end of the selected files in a directory ? First two characters must be skipped ? 4 characters must be replaced by 4 others ? or 7 others ? Replacing DSCN by 'aug2008' ? Example of the possibilities : |

|
|
For a reset of the mask-string : Select string and click the Name-button under it. For a 'reset all' go to the pull-down of 'F2 Load etc' : 'default'. But also here : the more precision you want, the more work and insight needed. RegEx is also there. And sometimes two sessions are needed to get the proper result. |
|
Packing and unpacking (ZIPs). Packing is Alt-F5. Unpacking is Alt-F9. Or via the pulldown of 'File'. Or with the The setting of TC is ideal for (un)packing of files, because it's always a matter of source and destination. If one works mostly with the Zip-format, then with TC the presence for a program like WinZip is no no longer needed. Select 1 or more files/directories. After the zip-command you get the Packing-window : |

|
|
A - Path of destination and filename of the Zip to make. As a default the string is used of the name of the source-directory, but this can be edited. Make sure while editing, that the extension of the file remains intact. B - Leads to the zip-part of Configuration/Options. Settings of external programs like WinRar, LHarc and other applications like Listers and Catalog-makers. C - List of those other applications. Working with Zip-files (other extensions work the same) : Be sure of course, that the source-side is the active one, before the command is given. Sometimes the files inside can be read directly. 'Readme.txt' does, bitmaps don't. So files can be copied, moved, or viewed. But in a limited way. Files of an opened Zip can only be copied to get them out, not moved. Deleting a file in that Zip, if needed, must be done with another action. With adding a file to a Zip it can be both copying or moving. First they have to be unpacked, before one can start the real installing. To keep survey it is useful to make a (temporary) dir with F7 as the destination for the unpacked file(s). Makes it easier too afterwards to clean up the mess, which the average program leaves behind. |
|
Testing exe-files when installing software : A variation off a Zip-file has, like programs, the extension 'exe', if it is a self-extracting format. This means, that such a file does not need an un-zipper, but unpacks itself if activated. This can give confusion after downloading a new application. If the file is called 'setup.exe' it is pretty sure it activates a direct installation, but in other cases it might not be so obvious. It could also be such a self-extractor, which can cause the files to be put in an unexpected destination so there still has to be searched for the real setup. Test for this : Put the exe-file on 1 side and provide an empty directory on the other side. Cursor on exe-file. Try a unZip. If an errormessage appears, the file is a real executable. |
|
Making FTP connections FTP is a very good example why you should use Total Commander, because it has just that standard situation of source - destination, which you both want to during FTP. To make a connection to one or more servers, first the right settings must be filled in, to add the item to the FTP-list. These settings are a simple case. Click on the FTP-button of the button-bar, or go to 'Net/FTP connect', or apply 'Ctrl + F'. Then choose 'New connection' : |
 |
|
Normally spoken only four things have to be filled in : Session : Name of the list-item, e.g. 'My Website'. Host name : the name of the FTP-server of the provider. And, to login, the username and password. After that it will be sufficient to choose the item and to click on 'Connect'. The active pane is always replaced by the FTP-side. Above the pane with the FTP-side there will be a button to disconnect after a session. Don't forget to make the system side the active pane first with 'Tab' before starting to copy. |
|
File icons Some programs have a choice of several icons. Like Irfan View : Graphic files can have different extensions. This icon-choice can then be used to make a distinction between those formats in the TC-panes, while each icon still activates Irfan View :  With cursor on file this can be done via File/Associate with.. - Edit type - Change icon. |
|
The command line The commandline is at the bottom, on top of the bar with the function keys : You can type a command and execute with Enter. The path is coupled to the active pane. |
|
Run DOS To be found under Commands The DOS box of TC has the advantage, that the path of the active pane already is filled in :  While DOS via Start/Programs always starts with the default Windows path. |
|
Making a sub custom bar If you want to keep the standard button bar of TC intact, but yet want to add e.g. programs, there is the possibility of a 'subbar', to which can be switched as the actual active bar. So there will be, beside the file 'default.bar', e.g. also a file 'apps.bar' which can be loaded. Suppose you want to create such a subbar. Then a less handy function of TC comes on the scene. Then the button 'Add Subbar', of course chosen, will lead to a open-dialog for a '.bar' file.. While this file still has to be made. Only the file 'default.bar' is available, but you want to leave that one intact. A crappy construction imo. One would expect a new, empty bar, on which one can add items, and then save as a new filename.bar file. This leads to the renaming of 'default.bar', the only one there, so without precautions of temporary placing a copy of 'default.bar' somewhere else, and replacing it in the proper dir afterwards, this can cause trouble. Then the adding of a prepared dummy .bar file, still empty, already will be much more convenient. Then one can just choose to open that one with 'Add Subbar' and add things. Only 3 ascii lines needed in such a dummy file : [Buttonbar] Buttoncount=1 button1= Switch between bars can be made via 'Change Button bar' - Button bar: - browse with >> to 'filename.bar'. This is quite long-winded. It's more elegant to switch to a subbar via a button in the main bar, implicating that every subbar needs a button, to be able to return to the main, default bar again. This return-to-main button can be the same in every subbar, and of course can be a single .ico file as well. Here is an empty subbar (dummy.bar), with 'tcmd-3d.ico' as return and 'empty.ico' as sub-choice from main. The last one to be able to edit to one's own taste. As with the extra subbar files and the optional icons, it's better for the survey to give these categories their own subdirs from the TC-root, so e.g. '\bars' and '\icons', as is is the case with '\plugins' |
If all is known of the terrain, then further Exploring isn't necessary any more. Then the Command-center takes over.