|
Irfan View ver 4.25 - Author : Irfan Skiljan Upsite mar 31 2010 |
| IRFAN VIEW Tips And TrickS |
|
About graphic files Editing bitmaps while keeping quality Diminishing bitmaps while keeping quality Direct Keyboard Shortcuts with an opened file Selecting an area of a bitmap |
|
After installation of Irfan View : First pay attention (or already during install) to the settings of the so-called 'associations' of the filetypes to their respective programs (those that will be started after a double-click on the file). Because Irfan View is, besides being a graphic program, also a media-player, there is a huge list of filetypes. A careful choice of those settings can avoid, that e.g. suddenly Itfan View becomes a default soundplayer, while that task was already given to another application. If IV is running, go with 'P' to the configuration, then to 'extensions'. In case of the mentioned problem one can (rudely) solve it by pressing 'Images only'. This is very dependent of the local situation and which programs are already present, so it can be very useful to go, at least once, step by step through that list. Further options in that configuration are very user-bound, so I can't give any advice here. There are for example lots of choices in what way Irfan View default puts an image on the screen, after opening the file. Better check the whole configuration, at least once, which by the way is wise to do with every new installed program. If one also wishes to use the available plugins for Irfan View, one has to make, in advance, in '..\IrfanView\' a subdirectory called 'plugins'. Copy, after an unzip, the files (including its possible subdirs !) into 'plugins'. The next time, Irfan View is started, the added plugins will, normally, function. |
|
About graphic files : Each picture, photo, drawing, scan, button, icon or logo on a computer belongs to the category 'graphic files', so-called 'Bitmaps'. In the course of time various different kinds of files for this has been developed : the 'Formats'. Each with its own properties. Each format has its own, unique file-extension (the term after the dot of the filename, e.g. 'jpg'.), from which important information can be derived, to know what kind of file you are dealing with, and what tools you have to use. (M$ means, that these extensions can stay invisible, which is very unwise. You can have, at the same time, a program on the PC called 'paint.exe', and a photo of paint called 'paint.jpg'. Not seeing the extension would cause unnecessary complications.) Bitmap-properties can be divided into two categories : Resolution and Compression : (There are more, but non-relevant for this introduction) Resolution : Resolution means the number of used colors. This can vary from 2 (black and white for a scanned tekst), upto 16 million, or the so-called 'full-color'. It's obvious, that, the more colors are used, the bigger the final file will be, because more codes (bigger numbers) are necessary, to produce any possible kind of color on the PC-monitor. On the screen a picture is constructed with points of light, the so-called 'Pixels'. This leads to the fact, that the dimension of a picture is expressed in, for example, a width of 640 and a height of 480 pixels. In this matter it is for a user important to know the setting of the monitor, to be able to have a reference. Nowadays this is often 800 x 600, or 1024 x 768, or even more. The tint of a pixel is constructed from 3 numbers for the quantities of Red, Green and Blue, the so-called 'RGB-values'. Each of those values can vary (in 'full-color') from 0 to 255. So : RGB-values 0 - 0 - 0 is black, and 255 - 255 - 255 is white. Is it pure red, so it is : 255 - 0 - 0, is it pure blue : 0 - 0 - 255, is it grey : 128 - 128 - 128. And bright yellow is 255 - 255 - 0. In this aspect it is useful to know, that a modification to make a picture a bit darker, simply means that the same quantity is subtracted from all 3 values. A somewhat darker grey for example could be 100 - 100 - 100, so 'value' minus 28. So all bitmap-modifications are really applied mathematical formulae. Simple or very complicated ones. The change (or 'save as') of a file into another format with the same, more, or less used colors is called 'Conversion'. It is clear, that, if a file with 16 million colors is converted into a file with 256 colors, some gradations of color will disappear in that proces. Often an edit-program will have some built-in function to choose the 'nearest color' available. It is also clear, that a bitmap originally having 256 colors, after conversion to full-color, can't have more different colors, because such data (numbers) is simply not present. But after a further modification other gradations can be possible in the resulting bitmap (See : Editing bitmaps ..) A special category of format, present in lots of applications : only tints of grey or 'greyscale'. This could be used for converting a full-color photograph into a black-and-white picture. Then with 256 different values of grey. (More values are not necessary, because all three numbers of R, G and B must be equal, otherwise it's not a grey.) Compression : Graphic files contain a 'description' of the image. Since a PC, just like a television, fills the screen by writing horizontal lines from top left to bottom right, an 'uncompressed' file will simply have a sequence of the colorcodes for each pixel, in the proper order. This means, that two such files, both with a dimension of 800 x 600 pixels, will have exactly the same size (in this case 1,440054 Mb). Because of the Internet a need occurred of smaller files with the same result to enhance the download durations. This led to techniques of compression. (e.g. the wellknown ZIP-format) Meaning a shorter description of something, but finally leading to the same result. An example : If the top line of an image of 800 x 600 consists of only the black color, an uncompressed file will have just 800 codes with '0 - 0 - 0' for black, representing that line. Here it is much shorter to describe that line with : 'do 800 times 0 - 0 - 0'. This evolved in all kinds of more or less sophisticated procedures of compression, according to the goals of the result. The balance between a smaller filesize and maintaining the quality. Also it has to be told here, that most of the compression-methods are 'destructive', meaning that, once some pixel-data is skipped during the compression, it will be impossible to magically recover that data with a 'de-compression'. (a ZIP can) The Extensions : BMP (on the PC) and TIF(F) (often option from a digital camera or a scanner) are uncompressed formats. So quickly becoming very big, but yet with the complete, exact image-information. (Both formats are not to be used on a web-page by the way.) JPG is the widely used compression-format for full-color, with the upcoming PNG-format, which has more quality, but often having a somewhat bigger filesize. Both are Net-compatible, as is the GIF-format, with a maximum of 256 colors, mostly used for small buttons, logo's and small animations. Each of these 3 formats have an option, in most applications, to set the percentage of compression, regarding the choice of preference to keep the quality, or a file as small as possible. |
|
Editing bitmaps while keeping quality : Main rule : Start with saving the original in an uncompressed format, like BMP, with another name. ( Extra bonus : less risk, that you loose the original by some unfortunate procedure. ) Perform the editing(s) with that BMP. Editing often has more steps. First cutting borders, than a gamma-correction and then a resize, etc. If every step undergoes compression, it can lead to loss of quality. If editing is finished, than it can be converted again to that compressed format (JPG etc), if needed. This also works for colour-resolution. Even if it is a GIF with 256 colours, save first in 16 million, edit that file and then 'decrease colors' again to that 256 for the result. Some effects you can only apply in full-color-mode, so than you have to anyway. |
|
Diminishing bitmaps while keeping quality : Main rule : See Editing bitmaps. Rule 2 here : Always do the resize only after any color-corrections or other modifications already are done, because the big image still contains the complete, original pixel-data, so yet delivering optimal results. With making smaller always choose for a 'Resize' (Ctrl+R) with the 'Resample'-mode active ('Size method').. Difference between 'Resize' (like by a browser) and 'Resample' (like with 'Thumbnails' of IV) : 
 Reducing size was done here in one time from 720 x 458 to 100 x 63 pixels. Be sure that, with default use, while changing the dimension of an image always 'aspect ratio' is enabled. Better not go in 1 time to a belittlement of for example 50 %. Even in 1 time going to 80 % can cause unnecessary loss of quality. Reason for this is, that, with every resizing, some pixels with colour-information disappear. So details get lost, edges are less sharp and the picture gets more 'fuzzy'. The method, to do this resizing in smaller steps, gives the opportunity to 'pep up' the result after each step with the 'Sharpen'-function (Shift+S), for the next step. So : Sharpen - Resize - Sharpen - Resize - Sharpen - Resize, and so on, until the target-size. The number of steps, to make the process happen, depends on the relation original / target. If e.g. a 'width' van 1248 must be resized to 640, it soon can take some 8 steps. Resizing can be set by pixel-values or percentages. Do the process with percentages and if there is an end-size pre-defined, then do the last step, when you are close, in pixel-values. The percentage of 'Sharpen' is default on 20, range 1 - 100 and can be changed via Image \ Effects \ Effects browser ( Ctrl+E ) \ Sharpen. A side-effect of 'Sharpen' can be, that unwanted stripes or speckles will occur in the bitmap. First wait, if they are still there after the next 'Resize' step. As stated : some pixels disappear. If still there, 'Undo' and skip the 'Sharpen' for one step, or lower the percentage of it. Finetuning of this method : Setting each step on 90 % resizing one could call a lineair process. But other curves are possible, which maybe function even better. Probably 6 x 90 % will score worse than the sequence 80 - 86 - 90 - 92 - 94 - 96. |
|
Direct Keyboard Shortcuts with an opened file : Keys to hit while viewing. They are not capital-sensitive. Red ones also in fullscreen mode. |
| A About Irfan View - Homepage-link, version and view icons available for bitmap-associations : |
|
|
|
B
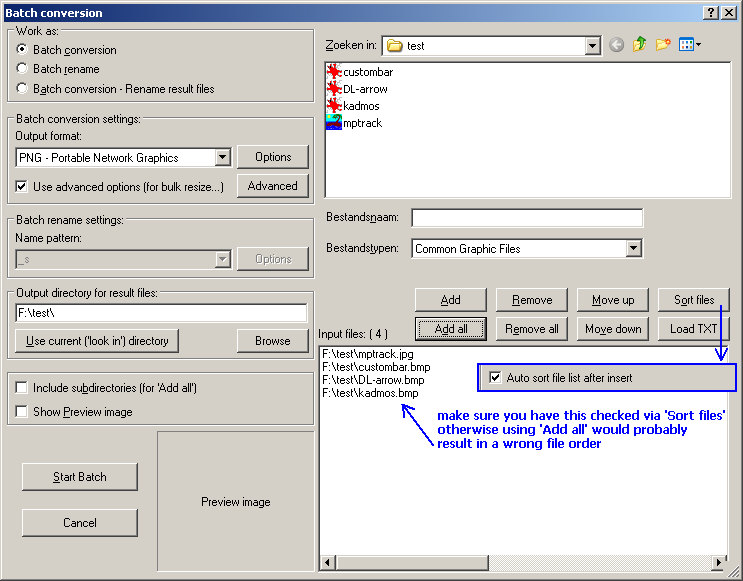
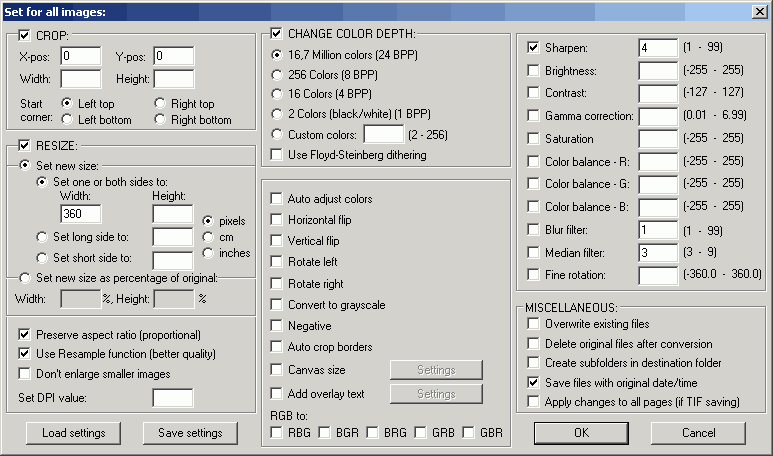
Batch Conversion / Rename - Most graphical tools are available in the process. Screenshot of dialog - Advanced options |
| C Screen Capture. Three area-types. Plus choice of Hotkey. Save-to-option. |
| D Clear display. Restart Irfan View. Rather unuseful. And no Undo possible. |
| E EXIF-information. Data of pictures by digital cameras. |
| F Fit Images to desktop. 'F' again for back to original. |
| G Stop Animation (GIF).. No pause but final stop. Back to first frame. |
| H Horizontal Flip. ('Mirror') |
| I Information. Properties of the current file. |
| K Filter Factory Plugins (.8bf). Effects from the plugins-subdirectory of IV. |
| L Rotate 90 ° Left. |
| M Minimize window to taskbar. |
| P Properties. Configuration of IrfanView. |
| R Rotate 90 ° Right. |
| S Save as. |
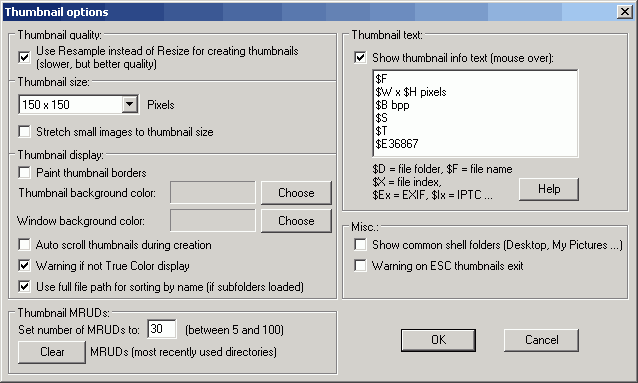
| T Thumbnails. With single- or group-save, HTML-generation and contact sheets. screenshot of the options. |
| V Vertical Flip. |
| W Slideshow. List can have more directories \ stations as source. Soundtrack possible. |
| Enter Fullscreen viewing. Escape (or another 'Enter') is back to window. |
| space View next file in directory. Hit Backspace for the previous one. |
| + - Zoom in/out. The plus- and minus-keys on the numeric pad at the right of the KB. |
|
Selecting an area of a bitmap : This can be used to cut off borders of an image, called 'to crop'. It can be done in different ways : 1) Manually. Click with left on the wanted (leftupper-)corner of the bitmap and draw, still pressed, a rectangle for the desired area. Then : Edit/crop selection, or Ctrl-Y. 2) Preset. This, if on forehand a certain size is wanted. Choose Edit/Create custom crop selection, or Shift-C. Set the desired values for height and width. Optionally the offsets for X and Y can be set (from left and top) for an exact position of the rectangle, but this can also be done manually by shifting the selection within the image, with R-click pressed to move the chosen selection. This shifting with R-click is also valid with a manual-made selection by the way. After the chosen position of the final selection : Edit/Crop selection, or Ctrl-Y. |
Sometimes a magnifying-glass is sufficient to do the job. No need for a hitech microscope.